Adding Realtime Post View Counter to Blogger Website will not require much knowledge about HTML, CSS, or JS because I have already designed it for you. What you need to do is to implement the codes in the right place in your Blogger Theme XML.

Creating Realtime Database and Adding Rules
First, we need to Create a Firebase Project to set up a real-time database in Firebase. We can be able to Store and Synchronize Data in real-time with a real-time database.
To create Firebase Project and real-time database follow these below steps:
Creating a Project in Firebase
Step 1: Go to Firebase Console.
Step 2: Click on Create a Project and Enter Project Name, accept the all terms and Continue.
Step 3: Enable and Configure Google Analytics even though you can disable Google Analytics for this Project skip this step and Click on Create Project.
Done! You have successfully created Project in Firebase. Now we need to set up a Realtime Database in this Project.
Realtime database setup and configuration
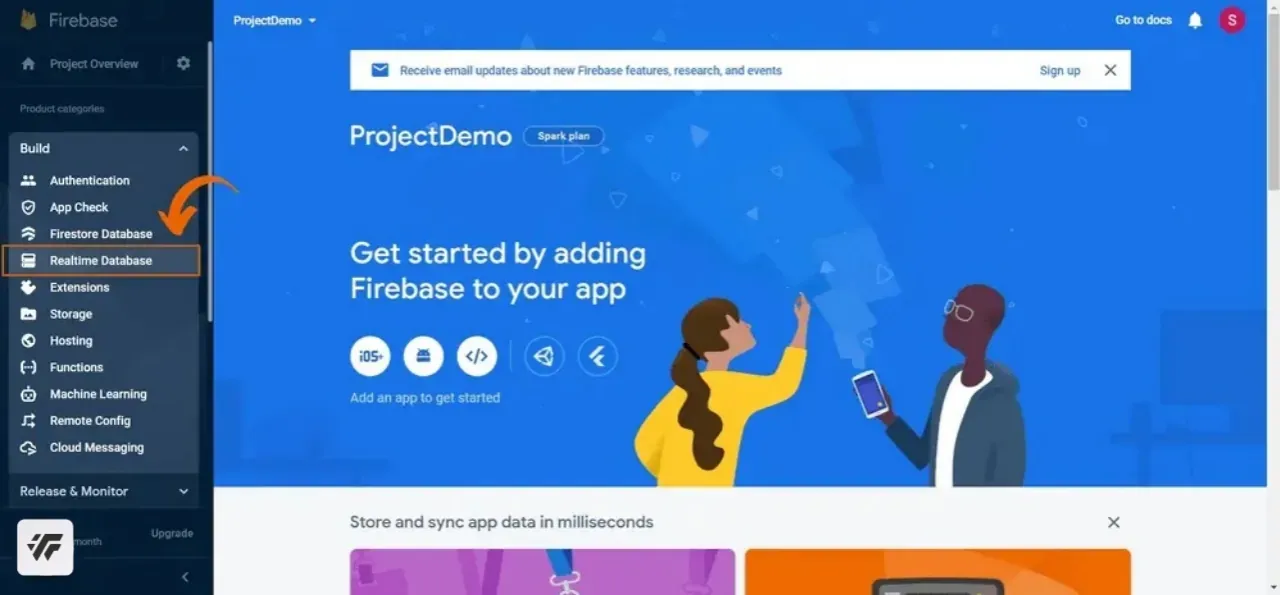
Step 1: Go to Firebase Console and Select your Project.
Step 2: Go to Realtime Database under the Build menu.
Step 3: Click on Create Database, Choose the preferred location, and click on Next.
Step 4: Choose Locked Mode and click on Enable.

Done! You Successfully Created Realtime Database, Now Copy the Below database URL And Paste it Somewhere it will be used in the theme HTML Setup.
Adding Rules to Database
Step 5: Now, Click on Rules and paste the following codes after replacing the marked parts with your Blog ID.
For Single Blog:
{
  "rules": {
    ".read": true,
    "BLOG_0000000000000000000": {
      ".read": true,
      "$post_id": {
        ".write": "newData.exists() && (data.exists() ? newData.val() == data.val() + 1 : newData.val() == 1)",
        ".validate": "newData.isNumber() && newData.val() % 1 === 0.0 && newData.val() <= 99999999"
      }
    }
  }
}
For Multiple Blogs:
{
  "rules": {
    ".read": true,
    "BLOG_0000000000000000000": {
      ".read": true,
      "$post_id": {
        ".write": "newData.exists() && (data.exists() ? newData.val() == data.val() + 1 : newData.val() == 1)",
        ".validate": "newData.isNumber() && newData.val() % 1 === 0.0 && newData.val() <= 99999999"
      }
    },
    "BLOG_0000000000000000000": {
      ".read": true,
      "$post_id": {
        ".write": "newData.exists() && (data.exists() ? newData.val() == data.val() + 1 : newData.val() == 1)",
        ".validate": "newData.isNumber() && newData.val() % 1 === 0.0 && newData.val() <= 99999999"
      }
    }
  }
}
Don't Forget to Replace marked Blog id with your Blog id.
Step 5: Click on Publish after making all the changes like the below image.

Theme HTML changes
Important!Before we start adding codes in XML, I will recommend you to take a Backup of your current theme. By chance, if any problem occurs, you can restore it later.
Step 1: First of all Login to your Blogger Dashboard.
Step 2: On Blogger Dashboard, click Theme.
Step 3: Click the arrow down icon next to the 'customize' button.
Step 4: Click Edit HTML, and you will be redirected to the editing page.
Step 5: Now search the code ]]></b:skin> and paste the following CSS Codes just above to it.
If your template has a dark mode feature, and if you want a different color when in dark mode, you can customize the codes as per your need. Each template can have a different dark mode class, so please adjust it, you can replace the marked class with your template dark mode class.
/*! Realtime Post View Counter by The Web Trick */
.pVw{display:inline-flex;align-items:center;background:#fff;padding:4px 10px;border-radius:10px;box-shadow:0 0 25px rgba(0,0,0,.02);color:#000;font-size:14px;visibility:hidden;opacity:0;transition:all .2s ease}
.pVw[data-view]{visibility:visible;opacity:1}
.pVw >svg{width:18px;height:18px;fill:none;stroke:#000;stroke-linecap:round;stroke-linejoin:round;stroke-width:1.5;margin-right:5px}
.pVw >svg .a{stroke:#204ecf}
.pVw::after{content:attr(data-view) ' views'}
.drK .pVw{background:#252526;color:#fff}
.drK .pVw >svg{stroke:#fff}
.drK .pVw >svg .a{stroke:#41b375}
Step 6: Now insert the following HTML codes where you want the display/show view counter in Blog Widget.
<!--[ Realtime Post View Counter by The Web Trick ]--> <span class='TWT_vw pVw' data-incr='true' expr:data-path='"BLOG_" + data:blog.blogId + "/POST_" + data:post.id'> <svg class='line' viewBox='0 0 24 24'><path d='M1 12s4-8 11-8 11 8 11 8-4 8-11 8-11-8-11-8z'/><circle class='a' cx='12' cy='12' r='3'/></svg> </span>
It can be changed from true to false so that it only displays the views and does not increase (+1) in value. For instance, you might use it to display post views on the homepage
Step 7: Add the next piece of JavaScript code immediately above the </body> tag. If you can't find it, it has likely already been parsed and is represented by </body>.
<script>
  /*<![CDATA[*/
  /*! Realtime Post View Counter by The Web Trick */
  (() => {
    /* config */
    const config = {
      databaseUrl: 'https://mydatabase-default-rtdb.asia-southeast1.firebasedatabase.app',
      abbreviation: true,
      lazyload: true
    }
    /* main scripts */
    eval(function(p,a,c,k,e,d){while(c--){if(k[c]){p=p.replace(new RegExp('\\b'+c+'\\b','g'),k[c])}}return p}('12 22(10,7){21 27=36();14(22=12(7,8){21 9=27[7-=47];220 0===22.55&&(22.57=12(7){34(21 8,9,15="",11="",10=0,27=0;9=7.61(27++);~9&&(8=10%4?64*8+9:9,10++%4)&&(15+=93.108(107&8>>(-2*10&6))))9="106+/=".104(9);34(21 23=0,53=15.40;23<53;23++)11+="%"+("101"+15.75(23).72(16)).63(-2);14 111(11)},10=141,22.55=!0);21 15=27[0],11=7+15,15=10[11];14 15?9=15:(9=22.57(9),10[11]=9),9})(10,7)}12 20(7,8){14 22(7-128,8)}31 33=(7,8,9,15)=>{12 11(7,8){14 22(7-120,8)}31 10=28.127(11(114,115));8&&(10.117=8),10[11(110,131)]=9,10[11(126,125)]=7,15&&(10[11(124,123)]=15),28[11(122,121)+11(119,112)]("118")[0][11(116,50)](10)},52=7=>{21 8=24[9(-19,-26)](25(7));12 9(7,8){14 22(7- -113,8)}14 51<=24[9(-18,-13)](25(7))?8*(24[9(-18,-5)](25(7))/51)[9(-17,-3)](2)+"145":44<=24[9(-18,-37)](25(7))?8*(24.42(25(7))/44).144(2)+"143":41<=24[9(-18,1)](25(7))?8*(24.42(25(7))/41)[9(-17,-3)](2)+"142":24[9(-18,2)](25(7))},30=()=>{12 9(7,8){14 22(7- -140,8)}33(9(-139,-137)+9(-130,-56)+9(-136,-135)+"134-133.46",9(-132,-146),!0,()=>{12 23(7,8){14 9(7-129,8)}33(23(97,109)+23(62,50)+23(66,69)+23(70,71)+"46",23(73,74),!0,()=>{12 7(7,8){14 23(8- -77,7)}45(29[7(-92,-91)]){21 8={};8.79=29[7(-84,-91)];31 27=94.96(8,7(-86,-90)+7(-85,-89)+7(-68,-88)+"7");34(21 9=28[7(-82,-87)+"98"](7(-92,-86)),15=27[7(-99,-85)](),11=0;11<9.40;11++){21 10=(9=9[11])[7(-67,-84)](7(-80,-83));(10=15.105(10))[7(-65,-82)](7(-100,-81),12(9,15){14 12(7){12 8(7,8){14 22(8- -32,7)}0<(7=7[8(49,60)]()?7.103():0)&&(9[8(102,95)](8(49,147),29.76?52(7):7),9.138.148(8(161,204))),8(205,48)==9[8(206,207)]("208-211")&&(9.212(8(48,47),!1),7=213(7)+1,15.214(7))}}(9,10))}}})})};12 36(){21 7=["215","216","218","219","203","221","222","232","225","223","224","226","227","228","229","230","231","233","217","202","172","200","169","168","167","166","165","164","163","162","201","159","149","158","157","156","155","154","153","152","151","150"];14(36=12(){14 7})()}(()=>{45(!0===29[20(170,59)]){21 43=[],39=[];31 38=()=>{12 7(7,8){14 20(7- -160,8)}0==43[7(-194,-209)]&&171==35[7(-193,-210)](7(-192,-183))&&(35[7(-191,-209)]("185",1),30())};199[20(58,198)+"7"](20(197,196),7=>{12 8(7,8){14 20(7- -195,8)}(0!=28.190.54&&0==39[8(-189,-188)]||0!=28[8(-56,-187)].54&&0==39.40)&&38()},!0),28[20(186,184)+20(173,182)](20(181,59))[0][20(58,180)+"7"](20(179,178),7=>{38()}),35[20(177,176)](20(175,174))&&30()}78 30()})()',10,234,'|||||||r|e|n|u|o|function||return|t|||||_0x1341d1|var|_0x285e|c|Math|Number||a|document|config|postVw|const||loadJs|for|localStorage|_0x2d8c||da|arSc|length|1e3|abs|arLz|1e6|if|js|311|310|301|612|1e9|abvr|x|scrollTop|hNvRCA|376|FWQYIR|1324|1318|306|charAt|629|slice|||630|||621|632|626|toString|633|645|charCodeAt|abbreviation|725|else|databaseURL||||||||||||||String|firebase|307|initializeApp|628|l|||00|326|val|indexOf|ref|abcdefghijklmnopqrstuvwxyzABCDEFGHIJKLMNOPQRSTUVWXYZ0123456789|255|fromCharCode|613|590|decodeURIComponent|606|337|589|578|595|id|head|594|278|602|593|576|592|587|591|createElement|975|989|360|597|358|app|ebase|375|359|378|classList|361|682|arguments|K|M|toFixed|B|370|308|remove|zgf0ys1PBMnY|y2XPy2S|yM9KEq|C2nYB2XS|ywrKrxzLBNrmAxn0zw5L|C2v0sxrLBq|tfPFvKLfvW|z2v0sxrLBq|BgvUz3rO|Bgf6EwXVywq|Dhj1zq|1514|317|zgf0ys12Awv3|C2v0qxr0CMLIDxrL|zxHPC3rZ|DMfSDwu|B25Jzq|zgf0ys1WyxrO|z2v0qxr0CMLIDxrL|zgf0ywjHC2u|1319|null|CxvLCNLtzwXLy3rVCKfS|1291|1306|1322|1312|1321|1316|1327|1336|1326|1295||1305|LZ_VIEW|1290|387|403|382|documentElement|||||1702|1343|1325|1330|window|lKHpqL92DW|AgLKzgvU|sg91C2uGt2yGqMXVz2DL|z2v0rwXLBwvUDhncEvrH|309|324|304|302|data|||incr|setAttribute|parseInt|set|C2nYAxb0|yxn5BMm|Awv3ienVDw50zxiGyNKG|C3jJ|B25SB2fK|void|z05HBwu|yxbWzw5Kq2HPBgq|Dg9gAxHLza|Ahr0Chm6lY93D3CUz3n0|ywjZ|yxrPyY5JB20VzMLYzwjH|C2vQCY84lJeWlJeVzMLY|zMiTyxbW|zwjHC2uTzgf0ywjHC2uU|zMiTzgi|zgf0ywjHC2vvCMW|C2LNBG|uMvHBhrPBwuGug9ZDcbw'.split('|')));
  })()
  /*]]>*/
</script>
Replace the marked parts, i.e.
1. Realtime Database URL in databaseUrl key.
2. true or false in abbreviation key.
3. true or false (recommended: true) in lazyload key.
Step 8: Lastly, click this icon to save the changes.
It's done now! The Realtime Post View Counter has been added successfully to your site. Your Blogger site now features a Realtime Post View Counter.
Final Words
If you have any questions about the code I shared for real-time post views counter on your blogger website, feel free to leave a comment below.
If you enjoyed this article, please consider sharing it with your friends and other blogging communities. I'm grateful.
Make sure you bookmark our website by hitting CTRL+D since I'll be sharing more amazing post and codes like this one in future entries.