
Welcome to our step-by-step guide on how to create a Progressive Web App (PWA) for your Blogger site! PWAs are a powerful tool for boosting user engagement and experience on your website, and with our easy-to-follow instructions, you'll have your own PWA up and running in no time. Whether you're a blogger looking to improve your site's functionality, or a web developer interested in the latest technology, this guide is for you. So let's get started!
What is Progressive Web App (PWA)?
Are you familiar with Progressive Web Apps (PWAs)? They're web applications that offer an app-like user experience, with features like push notifications and offline access. PWAs are designed to work seamlessly across all devices, including desktop and mobile, and can be installed on a user's home screen without the need for an app store. In this article, we'll dive into what PWAs are, how they work, and their benefits for both users and developers.
Benefits of Building a PWA for Your Blog
When it comes to improving the user experience of your blog, building a Progressive Web App (PWA) can provide a range of benefits. PWAs offer fast loading times, offline functionality, and push notifications, among other features. By creating a PWA for your blog, you can enhance the mobile experience for your readers and improve engagement. Additionally, PWAs can help boost your search engine rankings, as they are optimized for mobile devices and offer a seamless user experience.
Comprehensive Guide to Building a PWA for Your Blogger
While some of the steps may be challenging, following them carefully will ensure that you're able to create an outstanding PWA for your site. Let's get started!
To complete this process, you'll need a Custom Domain or a TLD Domain integrated with Cloudflare. This means you'll need to use domain extensions like .com, .co.in, etc., instead of .blogspot.com. Additionally, ensure that your domain is pointed to the name server of Cloudflare and activate the cloud proxy.
Requirements
Before we start, there are several things which must be required for Activating PWA:
- The blog's DNS must be managed through Cloudflare.
- Must needed a GitHub Account or create a Github Account.
- A
.pngimage of a Blog Icon with dimensions 512×512. - Capture five screenshots of your web pages and save them in the
.pngfile format.
Generate & Upload Favicon
- Create an icon logo for your blog and save it in the
.pngformat with dimensions of 512×512 pixels.
Please change the current name of the file to android-icon-512x512.png
- Go to favicon-generator.org and then upload the icon for your blog.
- Download the generated favicon and extract the files.
- *Remove unnecessary files that are not required, such as
manifest.json,browserconfig.xml
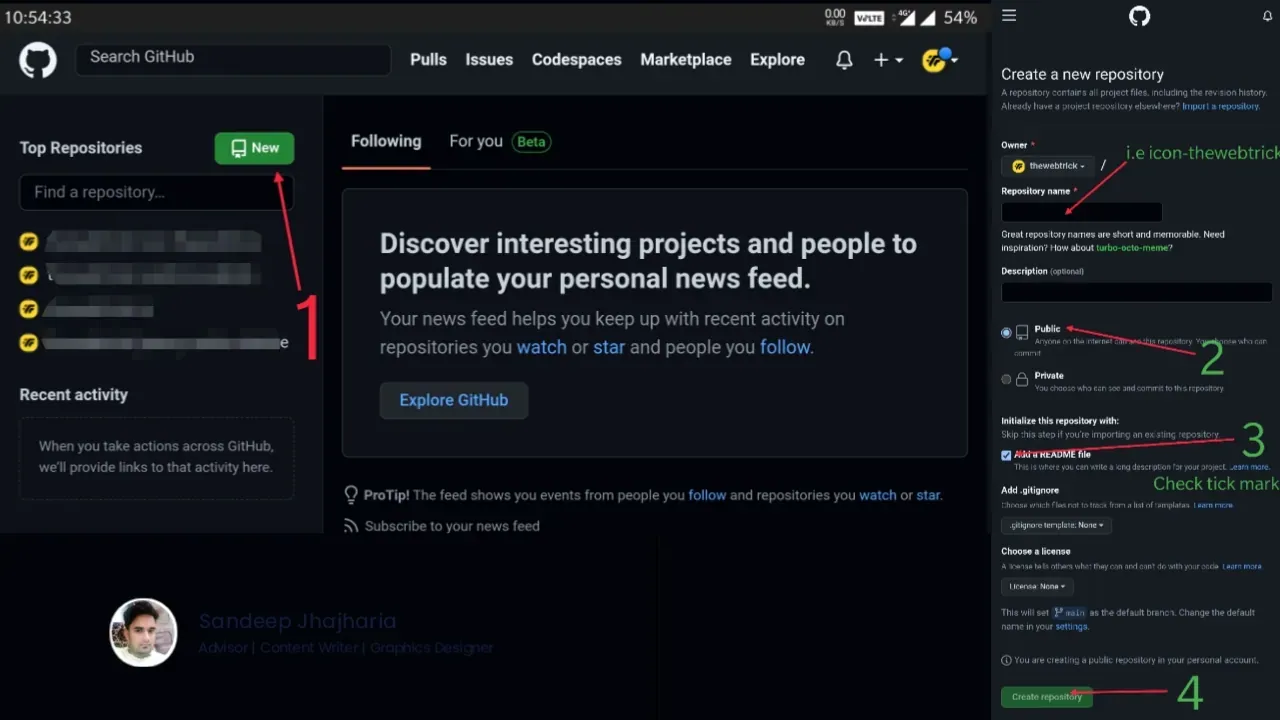
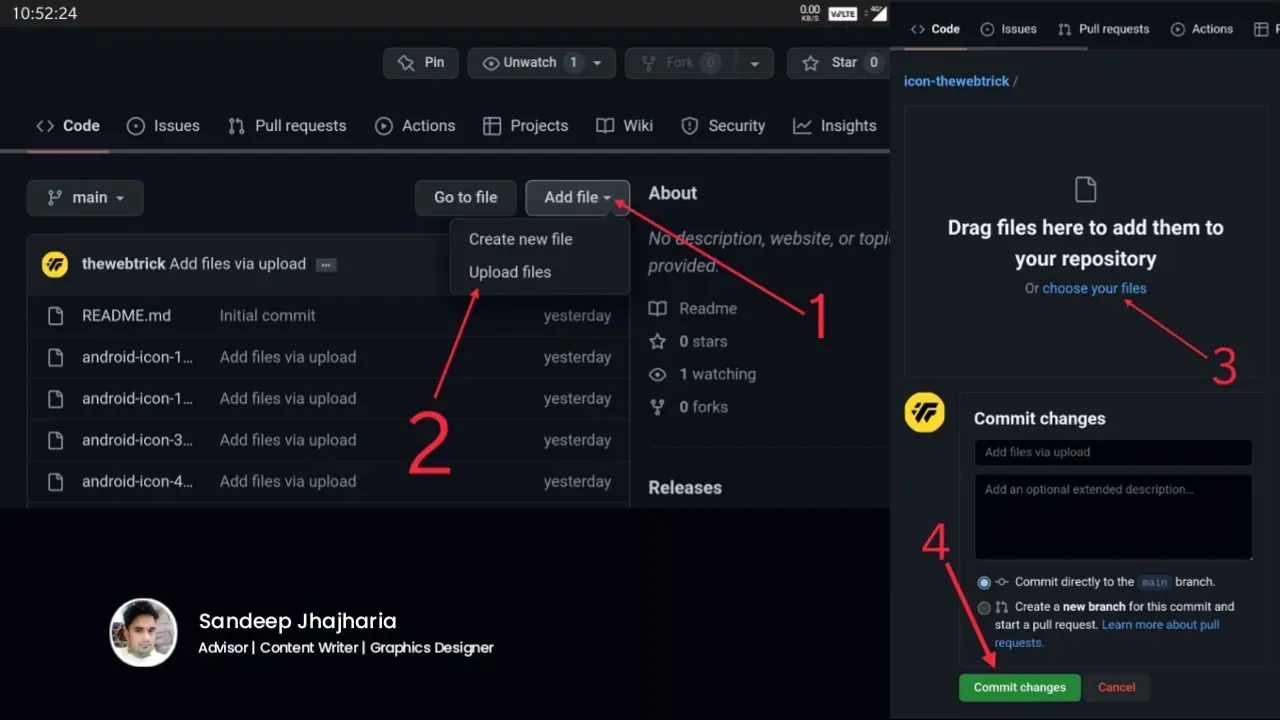
- Create a Repository, i.e.
icon-thewebtrickon GitHub and upload all the icon files inmainbranch.
*Upload the original file as well, i.e.android-icon-512x512.png.
How to Upload Screenshots: A Comprehensive Step-by-Step Guide
- To enhance your installation experience, please submit 5
.pngformat screenshots of your web pages, which will be visible alongside the install button. - Rename the screenshots in series:
scr1.png,scr2.png,scr3.png,scr4.png,scr5.png - Upload all screenshots with favicon in the
mainbranch of the icon-blogname Repository i.e icon-thewebtrick.
Creating Page Rule for Redirect
Page Rules in Cloudflare provide a powerful tool for website owners to customize how their website is handled by Cloudflare, which can lead to improved website performance, security, and user experience.
Page Rules are used to set up custom actions for a specific URL or a set of URLs. Users can use Page Rules to redirect URLs, cache content, add security settings, and much more. Page Rules are useful for improving website performance, enhancing security, and optimizing user experience.
Create a Page Rule in Cloudflare

- Login to your Cloudflare Account.
- Go to "Rules" section and click on "Create Page Rule" button.
- Click on URL(required) select and type your blog URL and add asterisk(*) i.e https://thewebtrick.com/*
- Next go to Then the settings are: and select in pick setting Forwarding URL.
- Next select 301 Permanent Redirect in Select status code.
- Final step add blog url with $1 Enter destination URL (required) i.e https://www.thewebtrick.com/$1
- Click on Save and Deploy.
Redirect Always HTTPS
- In the same way, "Create Page Rule" for https.
- Click on URL(required) select and type URL i.e https://*.thewebtrick.com/*
- Next go to Then the settings are: and select in pick setting Always use HTTPS.
- Click on Save and Deploy.
Creating Workers in Cloudflare
main, manifest, serviceworker, offline
Setup Main Worker

- Login to your Cloudflare Account.
- Go to Workers section and click on Manage Workers.
- Click on Create a Service and rename the service as
main, Select a starter as HTTP handler

- Click create service and tap on Quick edit button on next page.
- Replace all code in the previous script right click › Select All (
Ctrl+A). - Press
Ctrl+Vto paste all the script code with the following script.
addEventListener("fetch", event => {
  event.respondWith(handleRequest(event))
})

//const BUCKET_NAME = "main"
const BUCKET_URL = `https://cdn.statically.io/gh/thewebtrick/icon-thewebtrick`

async function serveAsset(event) {
  const url = new URL(event.request.url)
  const cache = caches.default
  let response = await cache.match(event.request)

  if (!response) {
    response = await fetch(`${BUCKET_URL}${url.pathname}`)
    const headers = { "cache-control": "public, max-age=14400" }
    response = new Response(response.body, { ...response, headers })
    event.waitUntil(cache.put(event.request, response.clone()))
  }
  return response
}

async function handleRequest(event) {
  if (event.request.method === "GET") {
    let response = await serveAsset(event)
    if (response.status > 399) {
      response = new Response(response.statusText, { status: response.status })
    }
    return response
  } else {
    return new Response("Method not allowed", { status: 405 })
  }
}
- *Replace the marked parts, i.e.
thewebtrickwith your GitHub username,icon-thewebtrickwith your Repository name - Click on Save and Deploy.
Setup Manifest.json Worker
- Similarly, you can generate a new service and update its name to
'manifest'. - Remove the current script and Replace with the following script:
addEventListener("fetch", event => {
  const data = {
    name: "The Web Trick",
    short_name: "The Web Trick",
    description: "Install Now The Web Trick - Let's fuel creativity",
    display: "standalone",
    prefer_related_applications: false,
    start_url: "\/?utm_source=homescreen",
    scope: "\/",
    background_color: "#ffd929",
    theme_color: "#ffd929",
    icons: [
      {
      src: "\/main\/android-icon-512x512.png",
      sizes: "512x512",
      type: "image\/png"
      },
      {
      src: "\/main\/android-icon-192x192.png",
      sizes: "192x192",
      type: "image\/png"
      },
      {
      src: "\/main\/apple-icon-144x144.png",
      sizes: "144x144",
      type: "image\/png"
      },
      {
      src: "\/main\/android-icon-96x96.png",
      sizes: "96x96",
      type: "image\/png"
      },
      {
      src: "\/main\/android-icon-72x72.png",
      sizes: "72x72",
      type: "image\/png"
      },
      {
      src: "\/main\/android-icon-48x48.png",
      sizes: "48x48",
      type: "image\/png"
      },
      {
      src: "\/main\/android-icon-36x36.png",
      sizes: "36x36",
      type: "image\/png"
      }
    ],
    shortcuts: [
      {
      name: "The Web Trick",
      short_name: "The Web Trick",
      description: "The Best Website where you can find Blogger Widgets, Tech News, Tech Reviews, Coding related Tutorials and many more.",
      url: "\/?utm_source=homescreen",
      icons: [
          {
          src: "\/main\/android-icon-192x192.png",
          sizes: "192x192"
          }
        ]
      },
      {
      name: "The Web Trick - Blog",
      short_name: "The Web Trick - Blog",
      description: "Explore The Web Trick Blog.",
      url: "\/search?utm_source=homescreen",
      icons: [
          {
          src: "\/main\/android-icon-192x192.png",
          sizes: "192x192"
          }
        ]
      },
      {
      name: "Blogger Widgets",
      short_name: "Blogger Widgets",
      description: "Useful Widgets for your Blog.",
      url: "\/search\/label\/Widgets?utm_source=homescreen",
      icons: [
          {
          src: "\/main\/android-icon-192x192.png",
          sizes: "192x192"
          }
        ]
      }
    ],
    screenshots: [
      {
      src: "\/main\/scr1.png",
      type: "image\/png",
      sizes: "540x720"
      },
      {
      src: "\/main\/scr2.png",
      type: "image\/png",
      sizes: "540x720"
      },
      {
      src: "\/main\/scr3.png",
      type: "image\/png",
      sizes: "540x720"
      },
      {
      src: "\/main\/scr4.png",
      type: "image\/png",
      sizes: "540x720"
      },
      {
      src: "\/main\/scr5.png",
      type: "image\/png",
      sizes: "540x720"
      }
    ],
    serviceworker: {
      src: "\/sw.js"
    }
  }

  const json = JSON.stringify(data, null, 2)

  return event.respondWith(
    new Response(json, {
      headers: {
        "content-type": "application/json;charset=UTF-8"
      }
    })
  )
})
- *Please modify the highlighted sections as per your requirements and make sure to record the color code.
- Click on Save and Deploy.
Setup ServiceWorker Worker
- Similarly, you can generate a new service and update its name to
'serviceworker'. - Remove the current script and Replace with the following script:
const js = `
importScripts('https://storage.googleapis.com/workbox-cdn/releases/5.1.2/workbox-sw.js');
if (workbox) {
workbox.core.skipWaiting();
workbox.core.clientsClaim();
workbox.core.setCacheNameDetails({
  prefix: 'thn-sw',
  suffix: 'v22',
  precache: 'install-time',
  runtime: 'run-time'
});

const FALLBACK_HTML_URL = '/offline.html';
const version = workbox.core.cacheNames.suffix;
workbox.precaching.precacheAndRoute([{url: FALLBACK_HTML_URL, revision: null},{url: '/manifest.json', revision: null},{url: '/main/favicon.ico', revision: null}]);

workbox.routing.setDefaultHandler(new workbox.strategies.NetworkOnly());

workbox.routing.registerRoute(
    new RegExp('.(?:css|js|png|gif|jpg|svg|ico)$'),
    new workbox.strategies.CacheFirst({
        cacheName: 'images-js-css-' + version,
        plugins: [
            new workbox.expiration.ExpirationPlugin({
                maxAgeSeconds: 60 * 24 * 60 * 60,
                maxEntries:200,
                purgeOnQuotaError: true
            })
        ],
    }),'GET'
);

workbox.routing.setCatchHandler(({event}) => {
      switch (event.request.destination) {
        case 'document':
        return caches.match(FALLBACK_HTML_URL);
      break;
      default:
        return Response.error();
  }
});

self.addEventListener('activate', function(event) {
  event.waitUntil(
    caches
      .keys()
      .then(keys => keys.filter(key => !key.endsWith(version)))
      .then(keys => Promise.all(keys.map(key => caches.delete(key))))
  );
});

}
else {
    console.log('Oops! Workbox did not load');
}
`

async function handleRequest(request) {
  return new Response(js, {
    headers: {
      "content-type": "application/javascript;charset=UTF-8",
    },
  })
}

addEventListener("fetch", event => {
  return event.respondWith(handleRequest(event.request))
})
- By utilizing Workbox, we are able to cache HTML, CSS, JS, and other static files.
- Click on Save and Deploy.
Setup Offline Worker
- Similarly, you can generate a new service and update its name to
offline. - Remove the current script and Replace with the following script:
const html = `<!DOCTYPE html>
<html>

<head>
  <!--[ Meta Tags ]-->
  <title>Oops, You're Offline!</title>
  <meta charset='UTF-8'/>
  <meta content='width=device-width, initial-scale=1, maximum-scale=1, user-scalable=0' name='viewport'/>
  <meta content='IE=edge' http-equiv='X-UA-Compatible'/>

  <!--[ Theme Color ]-->
  <meta content='#ffd929' name='theme-color'/>
  <meta content='#ffd929' name='msapplication-navbutton-color'/>
  <meta content='#ffd929' name='apple-mobile-web-app-status-bar-style'/>
  <meta content='true' name='apple-mobile-web-app-capable'/>

  <!--[ Favicon ]-->
  <link href='/main/apple-icon-120x120.png' rel='apple-touch-icon' sizes='120x120'/>
  <link href='/main/apple-icon-152x152.png' rel='apple-touch-icon' sizes='152x152'/>
  <link href='/main/favicon-32x32.png' rel='icon' sizes='32x32' type='image/png'/>
  <link href='/main/favicon-96x96.png' rel='icon' sizes='96x96' type='image/png'/>
  <link href='/main/favicon-16x16.png' rel='icon' sizes='16x16' type='image/png'/>
  <link href='/main/favicon.ico' rel='icon' type='image/x-icon'/>
  <link href='/main/favicon.ico' rel='shortcut icon' type='image/x-icon'/>

  <!--[ Stylesheet ]-->
  <style>/*<![CDATA[*/
/* Merriweather - Font */ @font-face{font-family: 'Merriweather'; font-style: italic; font-weight: 300; font-display: swap; src: local('Merriweather-LightItalic'), url(https://fonts.gstatic.com/s/merriweather/v22/u-4l0qyriQwlOrhSvowK_l5-eR7lXff4jvw.woff2) format('woff2'), url(https://fonts.gstatic.com/s/merriweather/v22/u-4l0qyriQwlOrhSvowK_l5-eR7lXcf8.woff) format('woff')} @font-face{font-family: 'Merriweather'; font-style: italic; font-weight: 700; font-display: swap; src: url(https://fonts.gstatic.com/s/merriweather/v22/u-4l0qyriQwlOrhSvowK_l5-eR7NWPf4jvw.woff2) format('woff2'), url(https://fonts.gstatic.com/s/merriweather/v22/u-4l0qyriQwlOrhSvowK_l5-eR71Wsf8.woff) format('woff')} @font-face{font-family: 'Merriweather'; font-style: italic; font-weight: 900; font-display: swap; src: url(https://fonts.gstatic.com/s/merriweather/v22/u-4l0qyriQwlOrhSvowK_l5-eR7NWPf4jvw.woff2) format('woff2'), url(https://fonts.gstatic.com/s/merriweather/v22/u-4l0qyriQwlOrhSvowK_l5-eR7NWMf8.woff) format('woff')} @font-face{font-family: 'Merriweather'; font-style: normal; font-weight: 300; font-display: swap; src: url(https://fonts.gstatic.com/s/merriweather/v22/u-4n0qyriQwlOrhSvowK_l521wRZWMf6.woff2) format('woff2'), url(https://fonts.gstatic.com/s/merriweather/v22/u-4n0qyriQwlOrhSvowK_l521wRpXA.woff) format('woff')} @font-face{font-family: 'Merriweather'; font-style: normal; font-weight: 700; font-display: swap; src: url(https://fonts.gstatic.com/s/merriweather/v22/u-4n0qyriQwlOrhSvowK_l52xwNZWMf6.woff2) format('woff2'), url(https://fonts.gstatic.com/s/merriweather/v22/u-4n0qyriQwlOrhSvowK_l52xwNpXA.woff) format('woff')} @font-face{font-family: 'Merriweather'; font-style: normal; font-weight: 900; font-display: swap; src: url(https://fonts.gstatic.com/s/merriweather/v22/u-4n0qyriQwlOrhSvowK_l52_wFZWMf6.woff2) format('woff2'), url(https://fonts.gstatic.com/s/merriweather/v22/u-4n0qyriQwlOrhSvowK_l52_wFpXA.woff) format('woff')}
/* Content */ body{background:#f1f3f6;color:#1f1f1f;font-family:'Merriweather',serif;font-weight:400;-webkit-tap-highlight-color:transparent;-webkit-touch-callout:none;-webkit-user-select:none;-khtml-user-select:none;-moz-user-select:none;-ms-user-select:none;user-select:none}body:focus{outline:none !important} .mainCont{margin:0 auto;position:fixed;left:0;top:0;right:0;bottom:0;display:flex;align-items:center;justify-content:center;padding:15px} .noIntPop{position:relative;overflow:hidden;text-align:center;padding:15px;border-radius:30px;background:#f1f3f6;box-shadow:inset 0 0 15px rgba(55, 84, 170, 0), inset 0 0 20px rgba(255, 255, 255, 0), 7px 7px 15px rgba(55, 84, 170, 0.15), -7px -7px 20px white, inset 0px 0px 4px rgba(255, 255, 255, 0.2)} .circle.t{top:-150px;right:-150px} .circle.b{bottom:-150px;left:-150px} .noIntCont{position:relative;z-index:1} .noIntIcon{padding:30px} .noConHead{font-weight:700;font-size:1.3rem} .noConDesc{font-size:16px;line-height:1.4em;padding-top:20px;font-weight:400;opacity:.8} .cta,.relCont{display:flex;justify-content:center;align-items:center} .relCont{padding:30px} .cta{width:66px;height:66px;background:#f1f3f6;outline:none;border:none;border-radius:690px;box-shadow:inset 0 0 15px rgba(55, 84, 170, 0), inset 0 0 20px rgba(255, 255, 255, 0), 7px 7px 15px rgba(55, 84, 170, 0.15), -7px -7px 20px white, inset 0px 0px 4px rgba(255, 255, 255, 0.2);transition:box-shadow 399ms ease-in-out} .cta:hover{box-shadow:inset 7px 7px 15px rgba(55, 84, 170, 0.15), inset -7px -7px 20px white, 0px 0px 4px rgba(255, 255, 255, 0.2)} .icon{content:'';width:25px;height:25px;display:inline-block} .iconB{content:'';width:50px;height:50px;display:inline-block} .icon.reload{background:url("data:image/svg+xml,<svg xmlns='http://www.w3.org/2000/svg' viewBox='0 0 24 24' fill='none' stroke='%239dabc0' stroke-width='1.5' stroke-linecap='round' stroke-linejoin='round'><polyline points='23 4 23 10 17 10'/><path d='M20.49 15a9 9 0 1 1-2.12-9.36L23 10'/></svg>") center / 25px no-repeat} .iconB.wifiOff{background:url("data:image/svg+xml,<svg xmlns='http://www.w3.org/2000/svg' viewBox='0 0 24 24' fill='none' stroke='%231f1f1f' stroke-width='2' stroke-linecap='round' stroke-linejoin='round'><line x1='1' y1='1' x2='23' y2='23'/><path d='M16.72 11.06A10.94 10.94 0 0 1 19 12.55'/><path d='M5 12.55a10.94 10.94 0 0 1 5.17-2.39'/><path d='M10.71 5.05A16 16 0 0 1 22.58 9'/><path d='M1.42 9a15.91 15.91 0 0 1 4.7-2.88'/><path d='M8.53 16.11a6 6 0 0 1 6.95 0'/><line x1='12' y1='20' x2='12.01' y2='20'/></svg>") center / 50px no-repeat} .circle{position:absolute;z-index:1;width:280px;height:280px;border-radius:50%;background-color:#f1f3f6;box-shadow:inset 8px 8px 12px #d1d9e6, inset -8px -8px 12px #f9f9f9}
  /*]]>*/</style>
</head>

<body>
  <div class='mainCont notranslate'>
    <div class='noIntPop'>
      <div class='circle t'></div>
      <div class='circle b'></div>
      <div class='noIntCont'>
        <div class='noIntIcon'>
          <i class='iconB wifiOff'></i>
        </div>
        <div class='noConHead'>Oops, You're Offline!</div>
        <div class='noConDesc'>It looks like your network connection isn't working right now.</div>

        <div class='relCont'>
          <button class='cta' onclick='window.location.reload()'>
            <i class='icon reload'></i>
          </button>
        </div>
      </div>
    </div>
  </div>
</body>

</html>`

async function handleRequest(request) {
  return new Response(html, {
    headers: {
      "content-type": "text/html;charset=UTF-8",
    },
  })
}

addEventListener("fetch", event => {
  return event.respondWith(handleRequest(event.request))
})
- *Modify the highlighted sections according to your preference.
- Click on Save and Deploy.
Set up Add Routes
- Next, return to the Workers section and select the option to Add Route.
- Enter the fields according to the table provided.

| Route | Service | Environment |
|---|---|---|
| www.thewebtrick.com/main/* | main | production |
| www.thewebtrick.com/manifest.json | manifest | production |
| www.thewebtrick.com/sw.js | serviceworker | production |
| www.thewebtrick.com/offline.html | offline | production |
- *Kindly input the necessary details, such as your blog's name and URL, in the designated spaces.
Attempt to access each URL individually, i.e www.thewebtrick.com/manifest.json www.thewebtrick.com/sw.js www.thewebtrick.com/offline.htmlwww.thewebtrick.com/main/android-icon-512x512.png
After accessing these URLs successfully, it is an indication that your Cloudflare setups have been completed. It is now time to make changes to your blog.
Edit Blog Template
- In Blogger dashboard, click on Theme.
- Click icon next to the Customize button.
- Paste the following codes below
<head>.
In case you can't find it, it would have been probably parsed which is <head>. Remove any duplicate codes that already exist.
<link href='/main/apple-icon-57x57.png' rel='apple-touch-icon' sizes='57x57'/>
<link href='/main/apple-icon-60x60.png' rel='apple-touch-icon' sizes='60x60'/>
<link href='/main/apple-icon-72x72.png' rel='apple-touch-icon' sizes='72x72'/>
<link href='/main/apple-icon-76x76.png' rel='apple-touch-icon' sizes='76x76'/>
<link href='/main/apple-icon-114x114.png' rel='apple-touch-icon' sizes='114x114'/>
<link href='/main/apple-icon-120x120.png' rel='apple-touch-icon' sizes='120x120'/>
<link href='/main/apple-icon-114x114.png' rel='apple-touch-icon' sizes='144x144'/>
<link href='/main/apple-icon-152x152.png' rel='apple-touch-icon' sizes='152x152'/>
<link href='/main/apple-icon-180x180.png' rel='apple-touch-icon' sizes='180x180'/>
<link href='/main/android-icon-192x192.png' rel='icon' sizes='192x192' type='image/png'/>
<link href='/main/favicon-32x32.png' rel='icon' sizes='32x32' type='image/png'/>
<link href='/main/favicon-96x96.png' rel='icon' sizes='96x96' type='image/png'/>
<link href='/main/favicon-16x16.png' rel='icon' sizes='16x16' type='image/png'/>
<link href='/main/favicon.ico' rel='icon' type='image/x-icon'/>
<meta content='#ffd929' name='msapplication-TileColor'/>
<meta content='/main/ms-icon-144x144.png' name='msapplication-TileImage'/>
<meta content='#ffd929' name='theme-color'/>
<link href='/manifest.json' rel='manifest'/>
- Replace the color code with code you used in
manifest.json
Proceed with the instructions based on your chosen template, either AMP or Non-AMP template.
Setup for AMP Template
If you have selected an AMP Template, you are required to adhere to the following steps.
- Please include the following AMP Serviceworker JS code below in
<head>or above to</head>.
<script async='async' custom-element='amp-install-serviceworker' src='https://cdn.ampproject.org/v0/amp-install-serviceworker-0.1.js'/>
- Paste the following codes above to
</body>.
<amp-install-serviceworker data-iframe-src='/offline.html' layout='nodisplay' src='/sw.js'/>
Setup for Non-AMP Template
In case you are using a Non-AMP Template, you are required to adhere to the following steps:
- Insert the given Javascript code at the top of the
</body>.
<script>/*<![CDATA[*/ /* Service Worker */ if('serviceWorker' in navigator){window.addEventListener('load',()=>{navigator.serviceWorker.register('/sw.js').then(registration=>{console.log('Service Worker registeration successful')}).catch(registrationError=>{console.log('Service Worker registration failed: ', registrationError)})})}; /*]]>*/</script>
Finally, after saving the modifications, access your blog using your Android mobile and you will come across a button that allows you to install your Progressive Web App.
Conclusion
The focus of this article is to guide you through the process of creating a PWA for Blogger, step-by-step. I trust you'll find it informative and enjoyable. Don't hesitate to share this article with others. If you encounter any challenges or have questions, please ask us in the . Thank you!Reference:
www.thewebtrick.com